
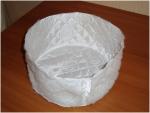
Embroidered Box
If you buy the Daisy design decorating this box in the photo, you will also get the PDF file containing this masterclass by Olla for free.
Click on the picture to see an enlargement
 To make this box, I bought a zipper only. Other details are made of snips of fabric which almost every sewing person always has too many.
 So, I needed:
1.Embroidered top.
2.Basic fabriq (dense raincoat fabric). Cut out:
- circle 24cm diameter;
- stripe 12х64cm;
- stripe 4х64cm;
- rectangle 12х14cm.
If the fabric is dense not enough, you need to glue it hard interlining.
3.Sides and bottom lining (quilted with padding polyester). Cut out:
- circle 24cm diameter;
- stripe 12х74cm.
4. Top lining (calico or atlas). Cut out:
- circle 24cm diameter;
- stripe 4х64cm;
- stripe 5х12cm.
5. Zipper 65cm length.
6. 1,5m decorative edging.
So, I needed:
1.Embroidered top.
2.Basic fabriq (dense raincoat fabric). Cut out:
- circle 24cm diameter;
- stripe 12х64cm;
- stripe 4х64cm;
- rectangle 12х14cm.
If the fabric is dense not enough, you need to glue it hard interlining.
3.Sides and bottom lining (quilted with padding polyester). Cut out:
- circle 24cm diameter;
- stripe 12х74cm.
4. Top lining (calico or atlas). Cut out:
- circle 24cm diameter;
- stripe 4х64cm;
- stripe 5х12cm.
5. Zipper 65cm length.
6. 1,5m decorative edging.
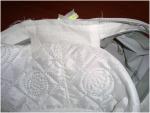
 Match two ends of the 12*74 cm stripe, forming a ring, and sew it together with the bottom.
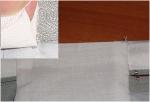
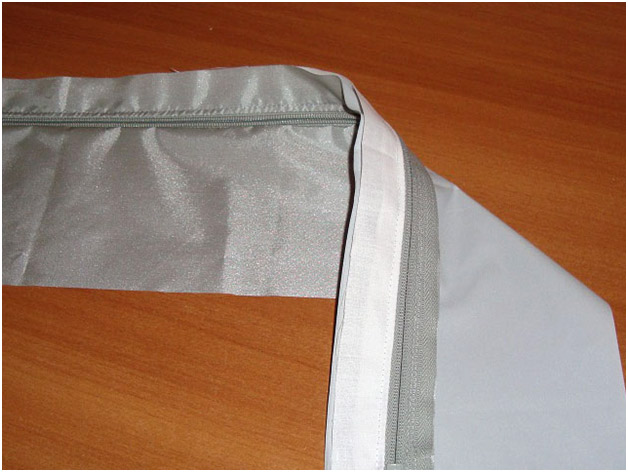
 Sew a zipper between the 12*64 cm and 4*64 cm stripes of the fabric. Line this with a narrow stripe of a lightweight lining and draw a line of decorative stitches on the narrow stripe along the zipper.
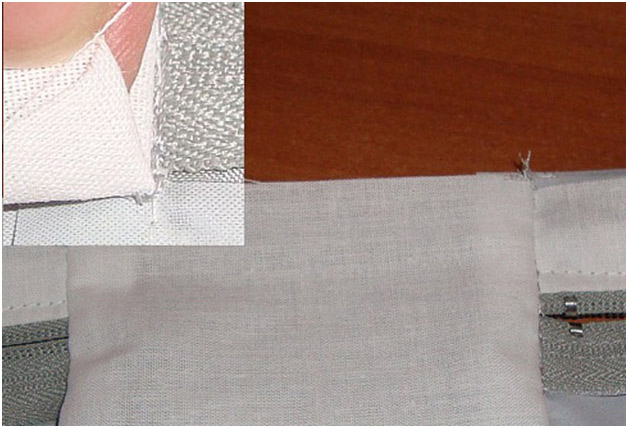
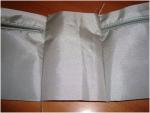 Now you have made sides of the box. Sew a rectangular 12*14 cm piece of fabric on the box sides to make a ring.
 Sew a 5*12 stripe of lining to the inner side, leaving 1 cm from the bottom unsewn.
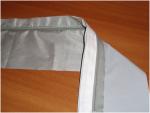
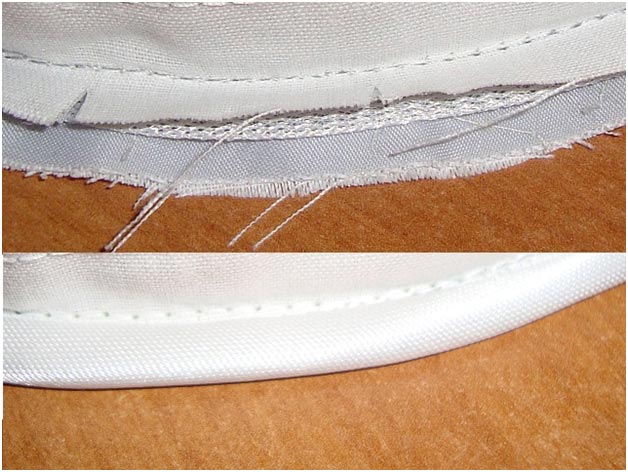
 Then you need to trim tops and bottoms of the sides with some piping.
 Sew the padding polyester first on the lining, facing it, then to the zipper, leaving some allowances to later turn the box inside out.
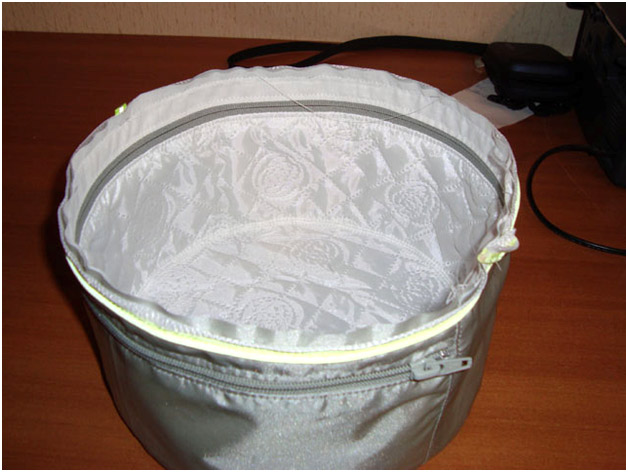
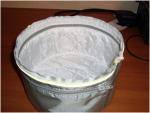 Your box is almost finished. All you have to do is to sew on the top of the box coupled with a lightweight lining...
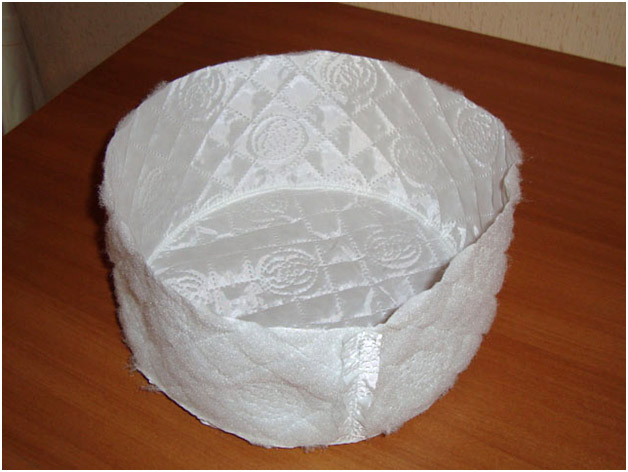
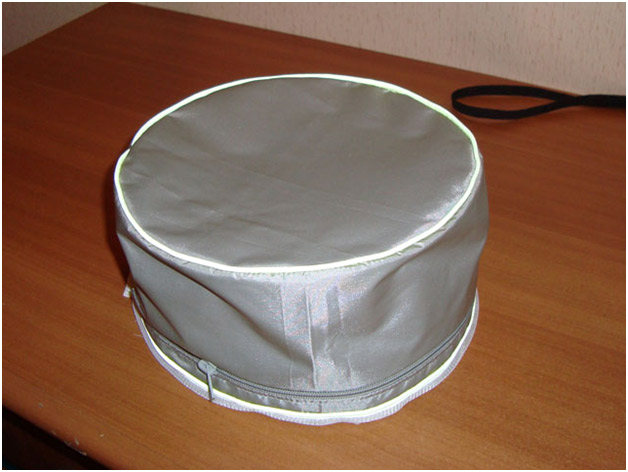
 ...and trim the seam with bias tape. Now you’ve done it!
To make this box, I bought a zipper only. Other details are made of snips of fabric which almost every sewing person always has too many.
 So, I needed:
1.Embroidered top.
2.Basic fabriq (dense raincoat fabric). Cut out:
- circle 24cm diameter;
- stripe 12х64cm;
- stripe 4х64cm;
- rectangle 12х14cm.
If the fabric is dense not enough, you need to glue it hard interlining.
3.Sides and bottom lining (quilted with padding polyester). Cut out:
- circle 24cm diameter;
- stripe 12х74cm.
4. Top lining (calico or atlas). Cut out:
- circle 24cm diameter;
- stripe 4х64cm;
- stripe 5х12cm.
5. Zipper 65cm length.
6. 1,5m decorative edging.
So, I needed:
1.Embroidered top.
2.Basic fabriq (dense raincoat fabric). Cut out:
- circle 24cm diameter;
- stripe 12х64cm;
- stripe 4х64cm;
- rectangle 12х14cm.
If the fabric is dense not enough, you need to glue it hard interlining.
3.Sides and bottom lining (quilted with padding polyester). Cut out:
- circle 24cm diameter;
- stripe 12х74cm.
4. Top lining (calico or atlas). Cut out:
- circle 24cm diameter;
- stripe 4х64cm;
- stripe 5х12cm.
5. Zipper 65cm length.
6. 1,5m decorative edging.
 Match two ends of the 12*74 cm stripe, forming a ring, and sew it together with the bottom.
 Sew a zipper between the 12*64 cm and 4*64 cm stripes of the fabric. Line this with a narrow stripe of a lightweight lining and draw a line of decorative stitches on the narrow stripe along the zipper.
 Now you have made sides of the box. Sew a rectangular 12*14 cm piece of fabric on the box sides to make a ring.
 Sew a 5*12 stripe of lining to the inner side, leaving 1 cm from the bottom unsewn.
 Then you need to trim tops and bottoms of the sides with some piping.
 Sew the padding polyester first on the lining, facing it, then to the zipper, leaving some allowances to later turn the box inside out.
 Your box is almost finished. All you have to do is to sew on the top of the box coupled with a lightweight lining...
 ...and trim the seam with bias tape. Now you’ve done it!